Ceramic Wall Tile Exporter to Brazil From India
Jun 05, 2026Connect With Our Team
Latest Blogs


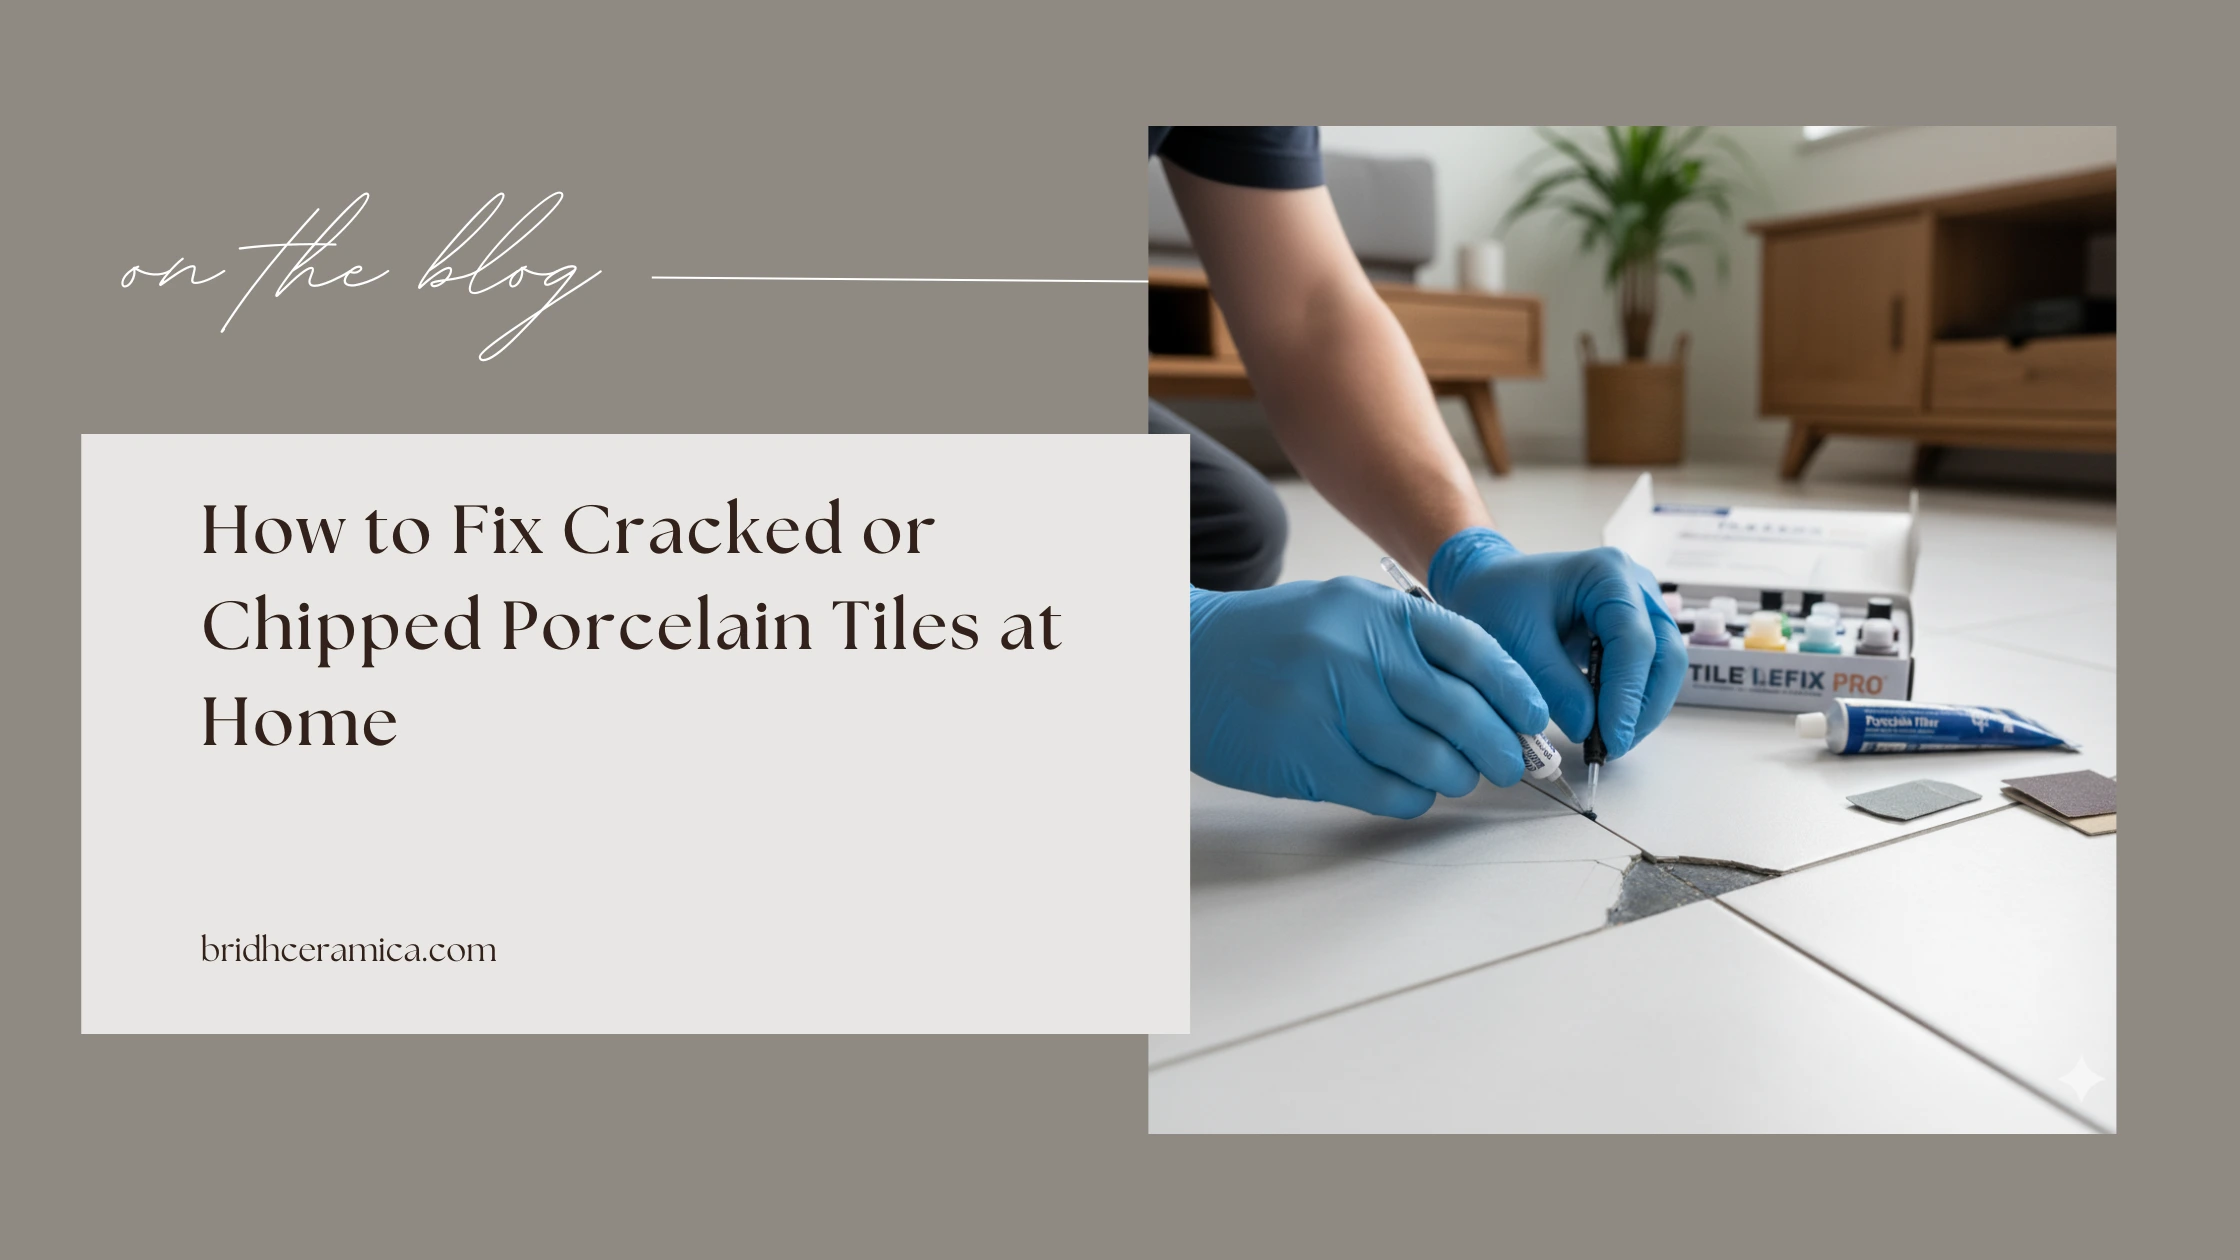
So, you've got a chipped porcelain or cracked porcelain tile. Bummer, right? It occurs, normally when an object of heavy weight falls or perhaps during installation. Don't worry, though. This can be fixed in most cases without necessarily invoking the services of the experts. We will go on a tour on how to address these little oopsies, starting with determining whether it can be fixed at all, to ensuring that it would appear as fresh. You will get to know how to prepare the area, how to fill cracks or chips in using the right stuff, and how to get that perfect finish. Let's get this done!
Key Takeaways
-
Assess the damage: Figure out if the chip or crack on your porcelain tile can be fixed at home or if it's time to call a professional.
-
Gather your supplies: Get a tile repair kit, sandpaper, painter's tape, and color-matching epoxy or glaze.
-
Prep the area: Clean the damaged spot, smooth any rough edges with sandpaper, and tape off the surrounding tile to keep things neat.
-
Repair the damage: Use touch-up glaze for small chips and cracks, or epoxy for deeper chips on the tile's edge. Color-matching is key here.
-
Finish and cure: Lightly sand the repair to match the tile's finish, apply a sealant, and let it dry completely before cleaning.
Assess the Damage to Your Porcelain Tile
It is prudent to have a glance before you reach out to any tools. Porcelain tiles are hard, though they are not unbreakable. Accidents occur, such as dropping a heavy pot or accidentally stumbling in the process of rearranging furniture, and in a short time, you have a chip or a crack.
Understanding Why Porcelain Tiles Crack or Chip
Several reasons make porcelain tiles crack or chip. There is always a case when it is a simple matter of chance. Some heavy object drops at the right place. In other instances, it could be the installation of the tile. Otherwise, when the surface beneath is not prepared accordingly, or when the weight on the tile is excessive, as time passes, the latter may cause stress fractures. Temperature variations can occasionally contribute but that is not typical in the domestic environment.
Identifying Repairable vs. Irreparable Damage
Here, you must be a sort of detective. A tile has tiny cracks on its side, which can be repaired with a quality repair kit. Just imagine it is a little ding on your car, you can usually buff it out. But when you have a large piece missing, or even when you have a crack that runs through the entire tile, particularly when it is in the centre of the tile, then this is normally an indicator that the tile requires replacement. Attempts to repair that large a size will not appear appealing and may not be stable.
Here's a quick guide:
-
Repairable: Small chips on edges, minor surface scratches, hairline cracks.
-
Likely Needs Replacement: Large pieces missing, cracks spanning the center of the tile, and shattered tiles.
When to Call a Professional for Tile Repair
Although most small problems with tiles can be handled by yourself, there are situations when professionals need to be employed. In case the damage is extensive, such as when a few or many tiles are broken or the whole area is involved, a professional will have the right equipment and experience to perform the task efficiently and make it appear good. Also, when you simply do not want to do the projects that require some DIY, or when you want a factory-like finish, it is a good idea to hire someone. They may be able to assist you in determining whether a tile is indeed beyond repair and requires replacement as well.
Gathering Essential Tools and Materials
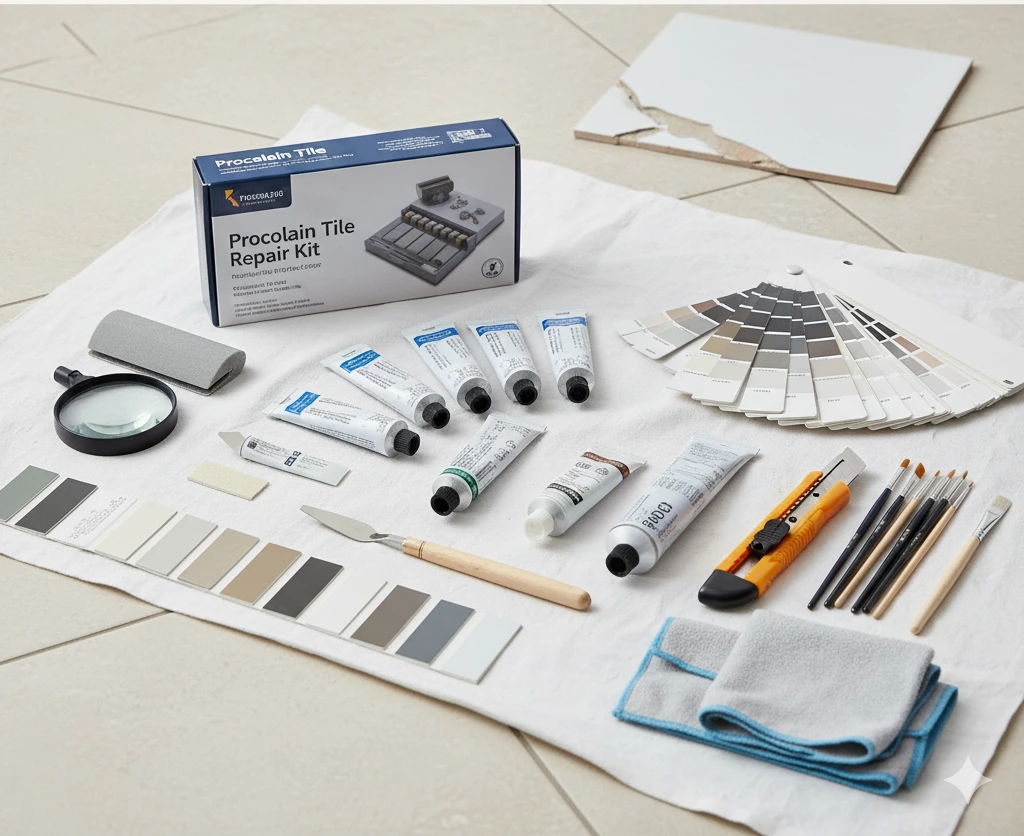
You will also want to check to make sure you have everything you are going to need before you start patching up those porcelain tiles. Attempting to repair a chip or a crack and finding out that you have lost something important to you is incredibly annoying. It is like you have just begun baking a cake and then you realise you have no egg to continue doing so- a definite mood spoiler to DIY projects.
Selecting the Right Porcelain Tile Repair Kit
When you go to the hardware store or go shopping on the Internet, you will find a variety of repair kits. The majority of kits will address smaller chips and scratches, but others can address more serious damage. Find a kit that specifically refers to porcelain or ceramic tile. These kits are often provided with a base colour and some tinting colours so that you can mix and match to a shade that is pretty similar to your existing tile. There may also be some kits containing a small applicator brush or a putty knife. Reviewing is a good idea to determine the compatibility of the colors with other users.
Necessary Tools for Chip and Crack Repair
A small tool, such as a utility knife or small craft knife, may come in handy when it comes to cleaning up the damaged part. You will also need a fine-grit sandpaper or say 220-grit sandpaper, in order to just even out the rough edges. Tape by the painter is an angel to save the surrounding tile and to have your repair confined. Also, you should remember to clean the area well with some rubbing alcohol or a solution of mild soap and water before you start. Two or three clean rags will also come conveniently.
Choosing Color-Matching Glazes and Epoxies
The hardest part in this whole process is likely to be getting the color right. The kits include a white base, but most of the tiles themselves are not an absolute white, so you will have to tint them. Here is where these additional color pastes, or even some of the remaining craft painting, will prove useful. It is possible that you will have to play around with it to find the right match. The epoxy filler is likely to be used to fill in deeper chips.
Ensure the epoxy you use is tileable and can be painted or coloured where the need arises. Certain color-matching epoxies are sometimes available; however, in many cases, it is better to mix them yourself. You should always remember not to put on too dark a shade at once but add dark colors gradually, then with a slightly lighter shade. A nice porcelain touch-up glaze can be found that may make this step easier.
Here's a quick rundown of what to have on hand:
-
Porcelain tile repair kit (with colorants)
-
Fine-grit sandpaper (e.g., 220-grit)
-
Painter's tape
-
Rubbing alcohol or mild soap and water
-
Clean rags
-
Utility knife or craft knife
-
Small mixing lids or a disposable palette
-
Toothpicks or small applicators
Preparing the Damaged Porcelain Tile Surface
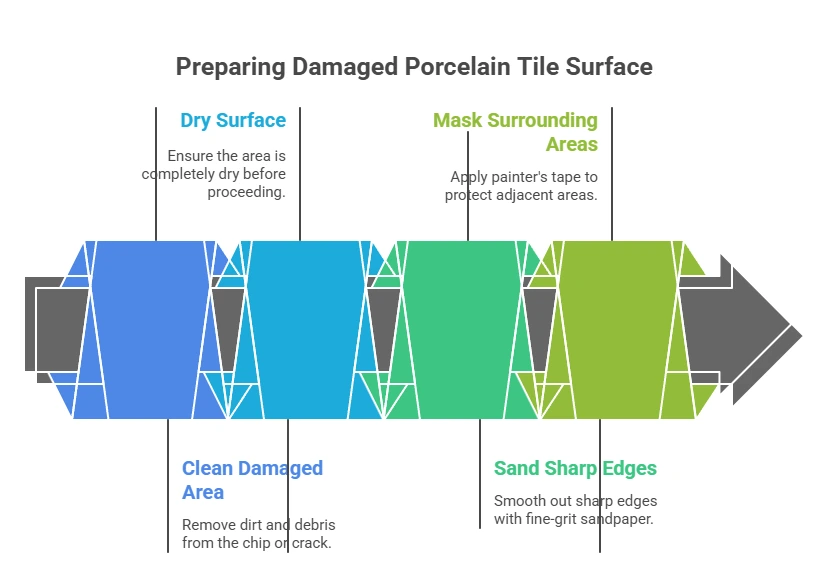
You are not even contemplating the process of taking that repair kit before you prepare that damaged spot. This pre-preparation is really essential. Otherwise, you may not stick or work out as well as it can. It is as though you are trying to paint a dirty wall, it is not going to come out right.
Cleaning the Chipped or Cracked Area
The very first thing that you must do is to remove the damaged area. Take a damp cloth, perhaps with a small dollop of gentle soap or even some rubbing alcohol, and wipe away the dirt, dust, or even gunk that has accumulated in the chip or crack. You desire a clean working surface to help the repair material bond. Be sure it is completely dry and then proceed. Do not make a haste of this, serious matter. A drop of water left over can get everything disarranged.
Sanding Sharp Edges for a Smooth Finish
When porcelain chips, it becomes surprisingly sharp. You do not want to cut yourself, and you do not want those sharp things to be in your repair. To do this, therefore, take some fine-grit sandpaper, such as 120 or 220 grit, and sand an angled or sharp edge about the chip or crack. This is not aimed at taking away the area, but merely to flatten it so that it is not jagged. This is also used to bring about a more favorable surface on which the filler or glaze can be bonded.
Masking Surrounding Areas to Prevent Spills
Here is where painter's tape comes in a useful way. You will want to tape the part around the chip/crack with great care. This leaves a clean border and prevents any repairing material from coming in contact with the good sides of the tile. It makes it much easier to clean and achieves a more polished result. Consider it as laying newspaper down on the wall before you paint it, it keeps off what you do not want to mess up anyway. Ensure that the tape is flattened to ensure that no epoxy or glaze will bleed.
Common Mistakes When Repairing Porcelain Tiles
Avoid these pitfalls to ensure your porcelain tile chip fix is successful:
-
Skipping Cleaning: Dirt or debris prevents filler adhesion.
-
Using the Wrong Filler: Only use epoxy or resin meant for porcelain.
-
Overfilling or Underfilling Chips: Can result in uneven surfaces.
-
Ignoring Safety: Always wear gloves and protective eyewear when handling epoxy.
How to Fix Chipped Porcelain Tile
Well, you have a small chip or perhaps a small scratch on your porcelain tile. Don't panic! In the case of smaller ones, you can very often perform a fairly good DIY fix in the comfort of your own home. It is not as though it were to reassemble an engine or anything, a little bit of handling. This is aimed at ensuring that the damage is gone without the notice of anyone.
Applying Touch-Up Glaze for Small Imperfections
In the case of the truly small scratches or small chips, a porcelain touch-up glaze is the way to go. Just imagine nail polish, but on your tile. These glazes normally have a little brush bound to the top, which is very convenient. All you have to do is shake the bottle, and then apply the glaze to the scratch or chip using a great deal of caution. A few coats of paint to fill it in all may be required. Allow one layer to dry before applying another one (approximately 30 minutes). It is a matter of accumulating the color and addressing the blank space.
Using Epoxy for Deeper Chips on Tile Edges
A bit stronger ability, such as a spot epoxy, will be required, however, in case the chip is a bit deeper, particularly when it is on the edge of the tile. It is heavier and will provide you with a heavier fill. It is normally applied using a small putty knife. Again, thin layers are key. You want to fill the chip to the maximum, but you need not panic and fill it to the brim yet. Allow the epoxy to dry for approximately 45 minutes. Depending on the drying effect of the paint, you may have to apply the first layer again.
Color-Matching and Blending Repair Materials
It is here where you can play the artist. This is extremely necessary in order to match the color of the repair to blend. The majority of repair kits include a base color, and in most cases, it is possible to add a small portion of craft paint or even house paint to achieve a perfect match. It is better to swirl your color in a small container. Keep adding a very little drop of color and stir it up. Test it on a scrap of cardboard or, if you have a scrap tile, test it on a scrap tile. You would like it to resemble your current tile as much as possible. It is always easy to add more color and hard to take away, so be slow. After you have the right match, apply it immediately since this stuff dries in a very short time. Should you have a large amount of chips, you may need to combine some batches.
How to Fix a Small Chip in Porcelain Tile: Quick Steps
-
Clean the Area: Wipe the chipped area with a damp cloth to remove dust, dirt, or grease.
-
Prepare the Filler: Use an epoxy filler or porcelain repair kit according to the instructions.
-
Apply the Filler: Carefully fill the chip with the epoxy using a putty knife. Overfill slightly to allow for sanding later.
-
Smooth the Surface: After the filler dries, sand it gently until it is level with the surrounding tile.
-
Optional Touch-Up: Use matching paint or a porcelain touch-up kit for a flawless finish.
Fixing Cracked Porcelain Tile Surfaces
You see, you have a crack in your porcelain. It happens, right? It makes no difference whether it is something heavy falling or a mere wear and tear but a crack is an eyesore. The good part is that, in most cracks, particularly hairline cracks, you can self-repair them. It is not generally a very tricky activity; however, it does demand some patience and the appropriate resources. In the case of fix porcelain crack, the first thing is that not every crack is equal.
In case the crack is actually serious such as when it runs through the tile or the crack is in the center of a large space you may be facing the replacement of the entire tile. However, in the case of small cracks, particularly those that are situated at the edges, a repair can certainly be done. Here, the knowledge of how to repair chipped porcelain tiles or how to repair chipped porcelain tiles comes in.
Filling Hairline Cracks with Epoxy Filler
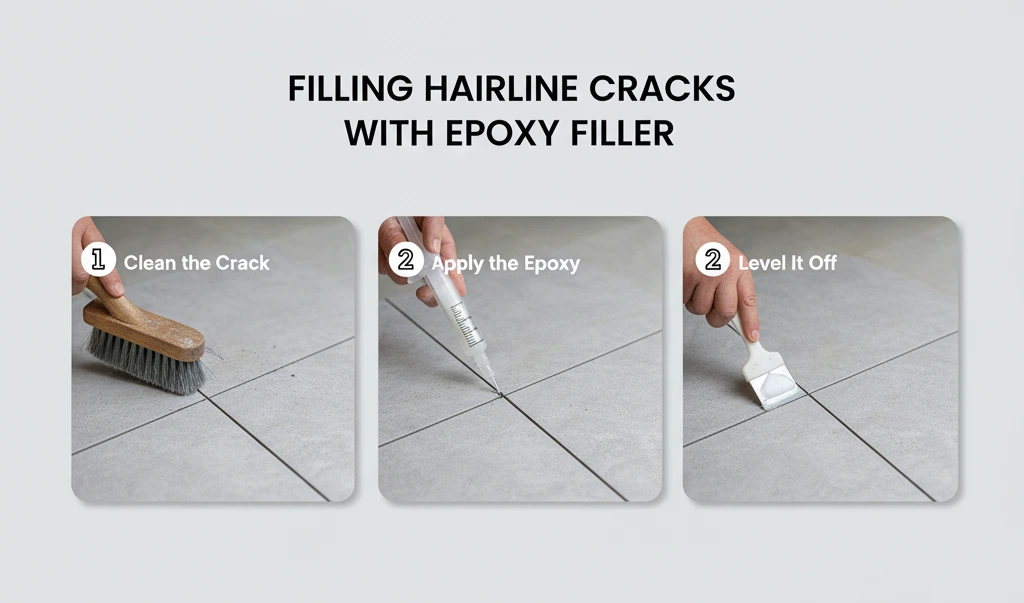
With hairline cracks that are annoying, epoxy filler is the best choice. You will be glad to get the place pre-cleaned and dry. The bond can be messed up with any dust or moisture.
Here’s a quick rundown:
-
Clean the crack: Use a soft brush or a vacuum to get rid of any loose debris. A little bit of rubbing alcohol on a cloth can help clean and dry the area.
-
Apply the epoxy: You can use a toothpick or a small craft stick to carefully apply the epoxy directly into the crack. Work it in gently.
-
Level it off: Use the flat edge of your craft stick to smooth the epoxy, making it level with the tile surface. Wipe away any excess right away so it doesn't harden on the tile.
Applying and Leveling Epoxy for a Seamless Look
Getting that epoxy level is key to a good porcelain tile chip fix. You would not like a bump protruding. Once the epoxy has been applied, you should then take your time in smoothing it. A small putty knife may be superior to a toothpick in case you are working on a broader crack. It is aimed at sealing the gap without creating a mound.
Sealing the Repaired Crack for Durability
After the epoxy is completely dry and you must always refer to the instructions of the product regarding the time it takes to cure the epoxy: it may take longer or even shorter then you may consider applying a sealant. This serves as a way of preserving the repair and making it resistant. Should the sheen of the epoxy slightly differ from your tile, it may require a little light sanding of the cured epoxy to finish like the tile before coating it. This measure is actually critical in making the repair less conspicuous and making it sustainable in the long term. And this is what constitutes a good porcelain tile crack repair.
Finishing Touches for a Flawless Repair
After filling chips and cracks, the next step is blending the repair with the existing tile.
Sanding Repaired Areas: Use fine-grit sandpaper (220-grit or finer) to smooth any bumps and match the tile’s texture and sheen. Matte tiles should look matte, and glossy tiles should retain their shine sand gently and check frequently.
Applying Sealant: Seal the repaired spot with a tile-specific or clear acrylic sealer to protect against moisture and wear, locking in color and adding durability.
Curing Time: Allow the repair to fully cure, usually 24 hours to 5 days before cleaning or heavy use. Rushing this step can damage the repair, so patience ensures a long-lasting result.
Bridh Ceramica is a reliable producer and exporter of tiles, and the company has earned a name as a producer of top-quality porcelain tiles for its clients all over the world. Bridh Ceramica provides a variety of glazed, non-glazed, and full-body porcelain tiles so that each item is of high quality in terms of durability, beauty, and accuracy. Their tiles come with a wide range of sizes and finishes to suit the aesthetic and functional needs of their users, and as such, they become the best selection to use in residential and commercial projects. Bridh Ceramica, with its promise of quality and innovation, remains ahead of the game in the tile industry.
Wrapping Up Your Tile Fixes
So, there you have it. It does not need to be a big headache to fix those little cracks and chips in your porcelain tiles. Although a significant break could result in the services of the professionals, most minor damages may be addressed with patience and the correct equipment. Always remember to do a good job in cleaning up, ensure you work carefully, and also allow your repairs to dry. To protect your tile installation, have the integrity upheld with professional repair or replacement when the damage is extensive.
Frequently Asked Questions
How do I repair a chip in porcelain tile?
You can repair a porcelain chip using a porcelain repair kit or epoxy filler. Clean the area, apply the filler, smooth it, and polish once dry.
Can you fix a porcelain tile crack?
Yes, small to medium cracks can be filled with epoxy or resin. For large cracks, professional replacement is recommended.
What materials do I need for porcelain tile chip repair?
Essential materials include a porcelain repair kit, epoxy filler, putty knife, fine sandpaper, and a matching touch-up paint if necessary.
How do I prevent porcelain tiles from chipping?
Avoid dropping heavy objects, ensure proper installation, and regularly inspect tiles to catch minor damages early.
Whatsapp Chatx
Hi! Click one of our representatives below to chat on WhatsApp or send us email to dhaval@bridhceramica.com

|
************** +91 97023 82809 |
 TILES VIEW