Unglazed Porcelain Tile Trends and Designs for 2026
May 05, 2026Connect With Our Team
Latest Blogs


Laying tile can really change the look of a room. It is a plumbing undertaking that every house-owner loves to do, yet it is simple to blow it out of proportion unless one is cautious. You remember, after I had tried to repair my bike? Total disaster. In any case, to have your tile installation look good and last, you need to avoid some of the pitfalls. We will discuss the major errors made by individuals in order to help you to get your tile job right.nd if you’re budgeting, keep in mind that backsplash installation cost, tile floor installation cost, wall tile installation cost, and replacing tile floor costs can vary depending on the material, tile size, and complexity of the design.
Key Takeaways
-
Always prep your surface. Make sure it's clean and level before you start laying tile.
-
Measure twice, cut once. Plan your layout carefully to avoid awkward cuts and wasted tiles.
-
Use the right tools. The correct trowel size and a good cutting tool are important for a good tile installation.
-
Don't skip expansion joints. They help prevent tiles from cracking due to temperature changes.
-
Give grout time. Rushing the grouting process can lead to a messy, unprofessional finish
1. Improper Surface Preparation
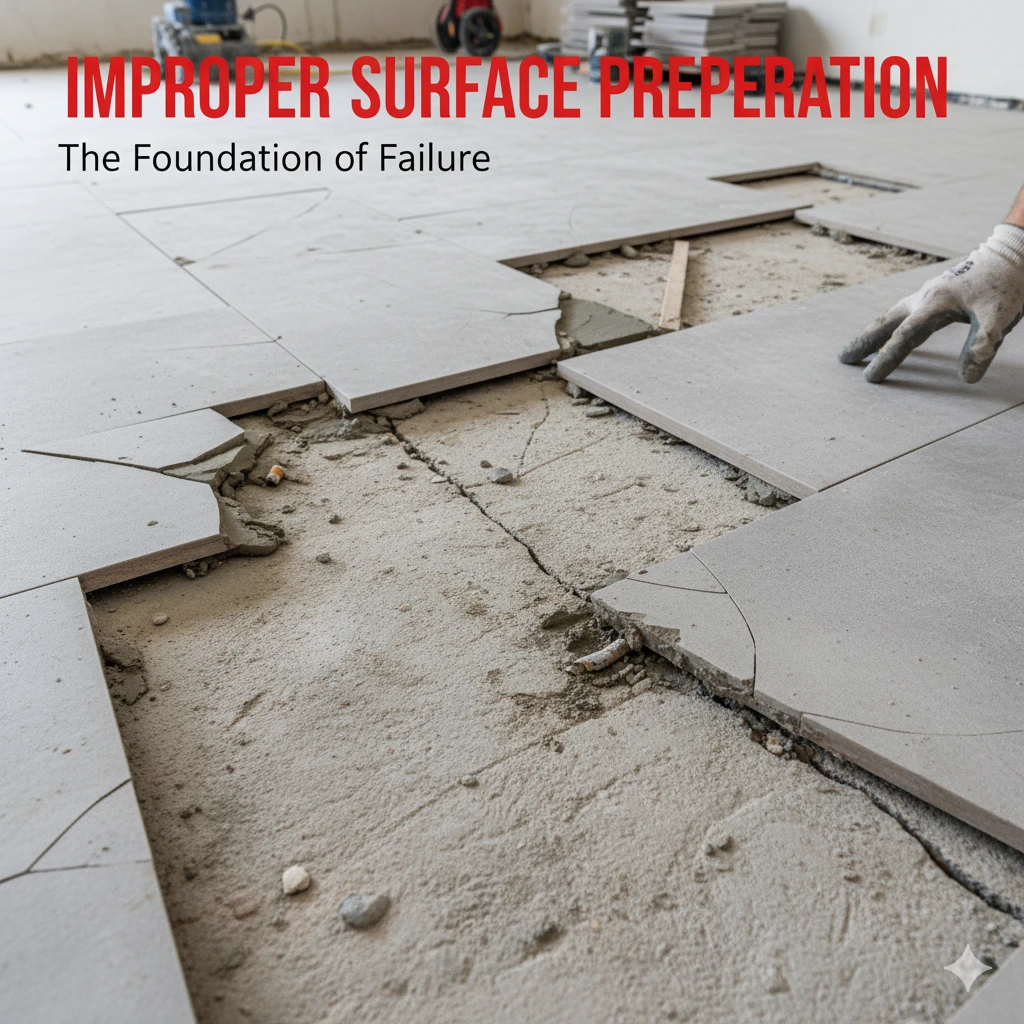
Okay, we will discuss the preparation of your surface for the tile. This is the step that is likely to be overlooked and to be honest, this is the basis of it all. When you do not take this, you are more or less preparing to run into trouble in the future. Imagine it as a house-building process, you would not begin to construct the walls without having a solid foundation, would you? Same idea here.
To start with, the surface must be clean. I mean, really clean. Removal of dust, dirt, grease, old adhesive, or anything that may be in the way of the adhesive to be applied on the tile should be performed. It is usually a good scrub with a light cleaner and water, but sometimes a more solvent one, such as a paint deglosser, may be required to deal with more stubborn grease or dirt. It would be enough to rinse it down a long time later. You want a surface that is willing to bond.
The surface must be smooth and flat, besides being clean. When your floor or wall is not levelled, your tiles will not lie flat, causing lipage (one tile edge raised higher than the other) and may split. You may be required to have a self-leveling compound when using floors or leveling mortar when using walls. Besides, test flexing or movement. When the surface is soft or bouncy, it should be reinforced, usually with a cement board or a special tile backer board. This is particularly necessary in wet places such as bathrooms or kitchens. Selecting the correct backer board ensures a durable installation, and it is possible to select options of various moisture levels.
Here’s a quick rundown of what to look for:
-
Cleanliness: Free from dust, grease, and debris.
-
Levelness: No high or low spots.
-
Stability: No flexing or movement.
-
Dryness: Especially important for backer boards and adhesives.
Don't underestimate the importance of this prep work. Taking the extra time now will save you a lot of headaches and potential repair costs later on. It’s the difference between a tile job that looks great for years and one that starts failing after a few months.
2. Incorrect Tile Spacing
You see, when you are laying out tiles, the little plastic spacers are not just a mere suggestion. They are actually quite big to the overall appearance, not to mention the durability of your tile work. A few headaches in the future can be caused by the mistake in spacing. Tiles can actually push up against one another, provided you lay them against one another with no space in between, and the house settles, or the temperatures vary. This pressure may crack or put tiles out. It is such a pain when it occurs, particularly when you have worked so much on it.
Anyway, what about spacing? It is simply a matter of providing a breathing space to your tiles. Grout is then poured into this space, and this acts as a cushioning element. That space, or the grout joint, is actually dependent on the type of tile that you are using and what appearance you want to achieve. A gap of 1/8-inch or 3/16-inch is quite typical with most normal ceramic or porcelain tiles. Larger format tiles, or tiles of a more rustic and hand-made appearance, may require a larger grout line, say 1 /4 inch or even greater. Always consult the manufacturers of the tile; they tend to know better.
Here’s a quick rundown on why consistent spacing matters:
-
Aesthetics: Even grout lines make the whole installation look clean and professional. Uneven gaps just look sloppy.
-
Grout Integrity: Consistent spacing means the grout fills the gaps evenly, creating a strong, unified surface.
-
Preventing Damage: As mentioned, those small gaps prevent tiles from cracking due to expansion and contraction.
Consider it in the following way: When you are constructing a wall using bricks, you would not simply place them one above the other, no matter their shape at the edges. You would put space between mortar, would you? Tile is kind of the same way. Your mortar is the grout, and the spacers will help you to get that joint of mortar just right. Don't just eyeball it. When placing the tiles, take a bunch of spacers in the size you require and insert them in between the tiles. It may seem like some additional effort, yet, believe me, it is a major difference in the end.
3. Wrong Trowel Size
Choosing the correct trowel for your tile job is a big issue. It is not only about applying the adhesive, which is known as thin-set, but also ensuring that the required coverage is applied as well as ensuring that the tile affixes. The most common mistake is to use a trowel with too small notches on your tile. This is because you will not have sufficient thin-set on the back of the tile, which will result in weak points and cracking across the line. Imagine attempting to apply peanut butter with a butter knife compared to a spatula; that spatula will last longer with a bigger surface.
Here’s a quick guide to help you match your trowel to your tile:
-
Small tiles (under 6 inches): A 1/4-inch square notch trowel is usually fine.
-
Medium tiles (6-12 inches): You'll likely need a 1/4-inch or 3/8-inch square notch trowel.
-
Large tiles (12 inches and up): This is where things get important. You'll want a trowel with deeper notches, like a 1/2-inch or even a 3/4-inch notch. For really big tiles, look for trowels specifically labeled for large format or medium bed thin-set.
The trick lies in making sure, as you lay the thin-set that the notches form ridges that, when pressed down by the tile, form evenly. This forms a complete, solid layer of adhesive, which is what you desire to have to form a strong bond. When the ridges remain excessive, you do not have adequate coverage.
Check the package when you purchase your thin-set. Bags with the term large tile or large format are designed to accept the thicker adhesive required with larger tiles. Even with the correct trowel, using the incorrect thin-set may be a problem. In case of bigger tiles, you will also need more thin-set, so you will also have to include it in your materials calculations. More information about selecting the right materials to use when installing large-format tiles is available in case you are working on a larger project. This is also critical with floating floor tile installations, where full coverage is important.
4. Improper Underlayment
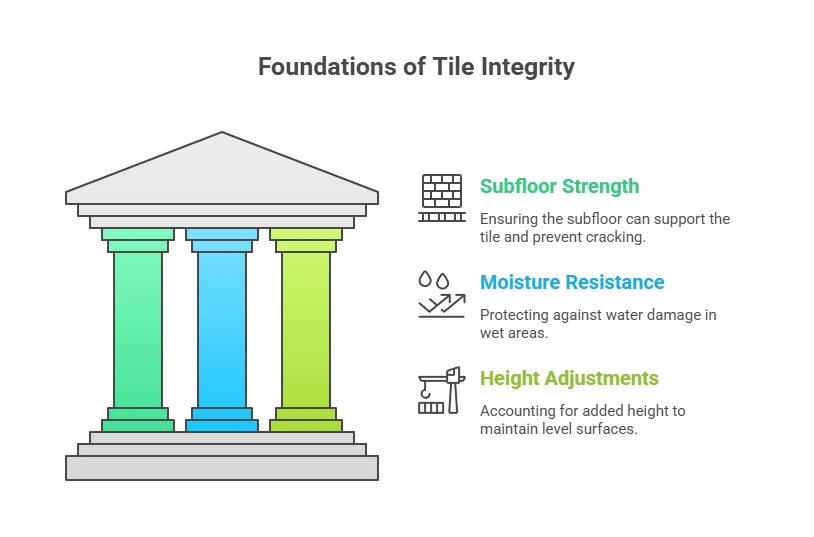
Consider your underlayment to be the base of your tile. Failure to have this base solid means that your entire project could derail in a very short time. Installing the improper type of underlayment or failing to install it properly will guarantee leaving one with broken tiles or sloping landscapes in the future. It does not only come to appearance, but to the life of your tile work.
The under-lay should be flat, stable and strong. When you are tiling over an existing floor, ensure that it is in good condition. Sometimes, old vinyl flooring can be used, provided that it is not damaged and thick, but most of the time, you will likely need to place a layer of cement board. This is more so in the wet places, such as bathrooms or kitchens. Half-inch or quarter-inch cement board gives a far better and stiffer subfloor than most subfloors.
Here’s a quick rundown of what to consider:
-
Subfloor Strength: Check how far apart your floor joists are. If they’re 16 inches on center, you’ll need a thicker cement board (around 1 1/8 inch) than if they’re 24 inches apart (where 1 1/2 inch might be better). This adds rigidity.
-
Moisture Resistance: For areas prone to moisture, like showers, a waterproof backer board is a must. It stops water from getting into the nooks and crannies, which can cause bigger problems later.
-
Height Adjustments: Remember that adding cement board will raise the floor height. You might need to adjust door clearances, toilet flange height, or even cabinet bases.
It is the same as constructing a house on sand by not taking the right underlayment. It may seem alright in the short term, but sooner or later, something is going to change and disintegrate. It will save so much in terms of headaches in the future, particularly when doing a tiling in a high-traffic area or where it is a wet area. It is a little step that counts a lot in the end result and you will avoid problems such as poor workmanship that may be a nightmare for your home. The correct underlayment is one of the major elements in the selection of a lasting tile floor installation. Cut no corners here; your tiles will make you welcome.
5. Not Buying Enough Tile
It is a very obvious frequent error, and, frankly speaking, this is often because individuals simply do not make plans. You lay out your space, perhaps you count twice, but then you stop thinking of all the cuts you are going to make, particularly near edges and corners as well as any features such as toilets or cabinets. In addition to this, the tiles may be broken during cutting or even when transporting. Better have an overload of tiles than have to scurry back home to get the same batch, only to find out that it is no longer available.
In order to calculate the amount of tile you really require, you just need to figure out the square footage of your room by first measuring the length and the width of the room. Then you should add 10 or 15 percent waste. This additional percent relates to the required cuts, any tile that may be broken and a possible future repair. Therefore, suppose you have a room that measures 100 square feet, then you would want to purchase approximately 110-115 square feet of tile.
Here’s a quick way to calculate it:
-
Calculate Room Square Footage: Length (ft) x Width (ft) = Square Footage
-
Add for Waste: Square Footage x 1.10 (for 10% waste) = Total Square Feet Needed
-
Check Tile Coverage: Look at how many square feet are in each box of tile.
-
Calculate Boxes: Total Square Feet Needed / Square Feet per Box = Number of Boxes to Buy
For example, if your room is 120 sq ft and each box covers 15 sq ft:
-
120 sq ft x 1.10 = 132 sq ft needed
-
132 sq ft / 15 sq ft per box = 8.8 boxes. You'd round up and buy 9 boxes.
This is whether you are carrying out bathroom tile installation, shower tile installation, or laying ceramic tile on the floor. It is prudent to spend a bit more evenly on the installation of a backsplash in a kitchen. The cost of installing the tiles may make some people skimp occasionally, but spending a little more at the beginning will save you a headache, and the extra expenses may not be needed in the future as opposed to the cost of replacing the tile floor or undertaking a tile installation of the bathroom again because you ran out. It is a minor expense to have a far smoother project, be it an installation of porcelain tiles or a simple remodeling of the wall tiles in the kitchen.
6. Cracking the Tile
It is no one who likes to discover a broken tile after all that work. It is annoying and will cost you a lot within a short time, particularly when you are working with more expensive materials such as porcelain. The occurrence of cracked tiles is, in most cases, due to a number of general problems either during the installation process.
A large malefactor is the cutting of the tile. You must have the right tool for the job. A diamond wet saw will be the most likely winner. You should cut at your leisure. Apply steady, even pressure. You can stress the tile and crack it either immediately or in the future, in case you push too hard or too fast. It is as though you were attempting to break a twig; you must have a neat cut, not a hacked rag.
Here are a few things to watch out for:
-
Cutting Technique: Always use a slow, consistent motion when cutting. If the saw blade starts to slow down, you're pushing too hard.
-
Tile Material: Some tiles, like porcelain, are harder and more brittle than others. They require a bit more care during cutting.
-
Underlying Support: Make sure the surface you're laying the tile on is solid and doesn't flex. A weak or uneven subfloor can lead to tiles cracking under pressure.
It is always important to remember that a small amount of patience in the cutting stage can save you a lot of headaches and wastage later on. Slow, clean cut is better than hurrying and results in a collection of pieces. The other error is failure to apply an adequate adhesive or failure to apply it evenly. This creates gaps between the tiles.
The unsupported surfaces are broken when you use the tile or put furniture on it. This is particularly true among large-format tiles. These larger tiles may have to be backed by putting a thin surface of adhesive on the back of the tile itself, as well as the adhesive on the floor. This provides you with a far greater bond, which is critical in floating floor tile installations.
7. Laid the Tile Out Wrong
This one is large and frankly, it is where many DIYers have been caught up. You are armed with your tiles and you are armed with your adhesive and you are ready to shoot. But wait! Do you ever even figure out in advance how the tiles will be on the floor or the wall before you begin to stick them down? It may seem obvious, but having a plan for your tile layout will save you an enormous amount of heartache down the line.
Think about the overall look. A straight or perhaps a diagonal pattern? In case you do a diagonal one, you will want to locate the middle of your room and make a chalk line at a certain angle of 45 degrees. Now you may begin to lay your first tile at that crossroads. You have to start there and outward. It is like sketching an image; you make the large lines first and then make the finer details.
Here’s a quick way to visualize it:
-
Dry Fit: Lay out a few rows of tiles in the area you plan to tile, without any adhesive. This lets you see how the pattern flows and where cuts will be needed.
-
Center Point: Find the center of your room or wall. This is often the best place to start, especially for patterns.
-
Chalk Lines: Use chalk lines to create a straight reference line. This is super helpful for keeping everything aligned, especially with diagonal or intricate patterns.
-
Edge Cuts: Pay attention to where your cuts will fall. You don't want a bunch of tiny, awkward slivers of tile at the edges if you can help it. Adjusting your starting point slightly can often fix this.
You may also believe that you can just have a look and feel, but believe me, there is no harm of planning. Just begin somewhere in the corner and go, you may find you have a very strange little piece of cut in the middle of your most noticeable wall or floor. That’s not a good look.
It should be borne in mind that the objective is to create a harmonious and aesthetically pleasing outcome. You will find that it will be a lot easier to install your layout with a little more planning and the finished product is worth a lot more. It is also done with proper planning that can manage the cost of tile floor installation and waste reduction, even in the case of future replacement of the tile floor.
8. Bad Grout
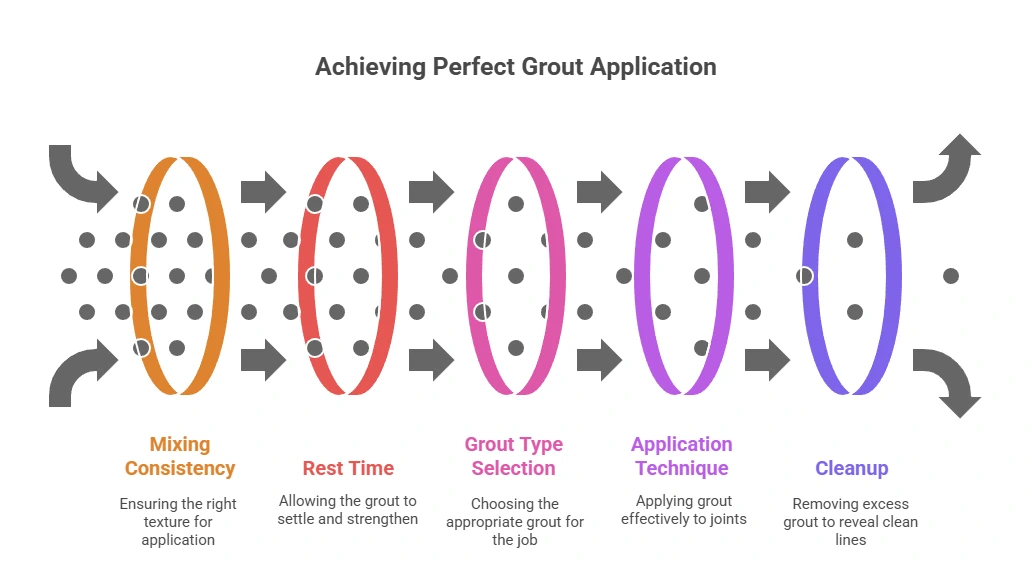
You have all your tiles laid out, all right, and they look pretty nice. Don't have the grout and make it all messy. Bad grout may completely take away the appearance of the best tile job. You would have those lines straight and smooth, not swollen and swarthy.
First off, mixing is key. You would like a consistency such as peanut butter. A drill may also appear quicker; however, it can blow air into the mixture, resulting in the weakening of the grout and its subsequent cracking in the future. Mix and leave to rest after about 10 minutes. This is a significant step.
In regard to the type of grout, one has a couple of choices. Sanded grout is hard and does not shrink very much, but is able to scratch delicate tiles such as metal or mother-of-pearl. The unsanded grout is stickier and it suits well on walls, particularly the showers, since it retains better. Backsplash installation cost can be included in the price in case of the concern of stains, whereby the use of better grout can be used, particularly in kitchens or bathrooms. In kitchens and places that have a lot of traffic, Epoxy grout is the best option. It is also less prone to stains and will not discolour with time, as cement-based grouts.
Here’s a quick rundown of what to aim for:
-
Consistency: Think peanut butter, not soup.
-
Rest Time: Let it sit for 10 minutes after mixing.
-
Application: Work it into the joints thoroughly.
-
Cleanup: Wipe away excess promptly and carefully.
The difference between clean grout lines and dirty grout lines is immense. The detail is what makes the tile stand out and look like a professionally made one. You should not cut corners on this part because it is worth the effort. The sealing of grout also goes into securing wall tiles and floor tiles in environments that are highly moist.
9. Ignoring Expansion Joints
All right, you have your tiles all down, looking good. However, did you not forget to allow them some room to breathe? This is where expansion joints are involved and frankly speaking, not mentioning them would be a big thing. The size of the materials varies with an increase or a decrease in temperature. Your tiles are no different. When they are crammed too tightly together, all that swelling and shrinking must have a way out, and characteristically, it takes the shape of pushing the tiles together. This pressure may result in any kind of problem such as broken tiles or lines of the grout, which simply collapse.
You must plan to install these joints. They consist of little holes that enable the tile and the surface materials below to slide slightly without any harm. It is not all about temperature either. Moisture, structural changes inside the building, and even direct sunlight are some of the factors that cause the tiles to move. Without these joints, your beautiful tile work will be like a puzzle that is disintegrating.
Here’s a quick rundown on making sure you get it right:
-
The expansion joints must be installed at the perimeter of the room at least 1/4 inch to the walls and fixtures. You may have to add more joints in between the field of the tile in larger rooms or spaces where there is a great difference in temperature.
-
These expansion joints should be filled with a soft material such as silicone caulk instead of grout that is stiff. The caulk is to be used in movement and will not allow the accumulation of stress.
-
Smaller tiles tend to have less movement as compared to larger tiles; however, expansion joints are still demanded irrespective of the size of the tiles.
Properly installed expansion joints are key to a long-lasting and beautiful tile installation. This is especially important when factoring in tile installation cost for large rooms or floating floor tile setups.
10. Rushing the Grouting Process
And now you have all your tiles laid out, and you are probably wondering when the job is going to be finished. Wait a moment, now, however, do not hurry over the grouting! When you get the grout mixed, or you simply smear it on the wall without monitoring, you will be left with some kind of uneven lines, possibly air bubbles and a great mess when you have to clean it all up afterwards. Getting the consistency is also quite significant, almost like thick peanut butter. The actual addition of air in using a drill makes the grout weaker, hence a trowel would tend to mix better.
Once mixed, allow to sit after approximately 10 minutes. This allows the water to penetrate well thus prevents cracking down of the road. Just imagine it as letting dough rest and then baking it.
Here’s a quick rundown of what to do:
-
Mix the grout to a smooth, peanut butter-like consistency. Avoid adding too much water.
-
Let the mixed grout slake (rest) for 10 minutes. This allows the chemicals to fully activate.
-
Apply the grout evenly, working it into the joints with a grout float at a 45-degree angle.
-
Clean off excess grout with a damp sponge, rinsing it frequently in clean water. Don't let the grout haze dry on the tiles.
It is a huge difference in the way you make your tile job look professional. It is usually worthwhile to invest some additional time now rather than regret it later. Correct grouting also influences the wall tiles installation and general backsplash installation cost, which will last longer and look finished.
Bridh Ceramic Trusted Tile Manufacturer & Exporter
As far as a person is concerned with quality tiles, the name Bridh Ceramica is a reputable one in the business. They produce and export the full variety of tiles, i.e. glazed and unglazed porcelain tiles, full body tiles, wall tiles and floor tiles. Bridh Ceramica is also known, as a consistent, durable, and elegant design maker of products applicable to residential and commercial projects. You are either installing a floating floor tile or a backsplash or renovating a tile floor, their product gives you a professional finish and performance.
Wrapping Up Your Tile Project
Therefore, we have covered some of the variety of ways things can go wrong when laying tile. It is so tempting to dive into it and do it; however, it truly does not harm to spend a few minutes preparing the surface, measure a bit (or, perhaps, thrice) and get the appropriate stuff to do the job. You do not want to reach the end and then notice that your lines are all lopsided, or worse still, you see that the tiles are already cracking. Follow these hints and you will have a much better chance of having a floor/wall that appears to have been installed by an expert rather than an amateur. Happy tiling!
Frequently Asked Questions
1. Why is preparing the surface so important before tiling?
Getting the surface ready is a big deal! If the floor or wall isn't clean, flat, and solid, your tiles might end up crooked or crack later on. Think of it like building a house – you need a strong foundation.
2. How do I know if I'm using the right size trowel for my tiles?
The size of the trowel's notches matters! Bigger tiles need more glue, so you'll want a trowel with deeper notches to spread a thicker layer of adhesive evenly. Check the glue packaging for recommendations based on tile size.
3. What happens if I don't leave space between tiles?
If tiles are pushed too close together, they can put pressure on each other. This pressure can cause them to crack or pop out over time, especially if the temperature changes.
4. Why is it important to buy extra tile?
It's always smart to buy about 10% more tile than you think you'll need. This extra amount is for cutting tiles to fit edges and corners, and just in case a few break during the process. Running out mid-project is a real headache!
5. Can I tile over my old vinyl flooring?
Sometimes, yes! If the old vinyl is flat, stuck down well, and strong enough, you might be able to tile right over it. But if it's loose or damaged, it's better to remove it or add a new layer like cement board first.
6. What's the best way to cut tiles without breaking them?
Using a diamond wet saw is usually the best bet. When you cut, make sure to use steady, gentle pressure. Rushing the cut or pushing too hard is a common way to end up with cracked tiles.
Whatsapp Chatx
Hi! Click one of our representatives below to chat on WhatsApp or send us email to dhaval@bridhceramica.com

|
************** +91 97023 82809 |
 TILES VIEW